Questions and tips on removing Paint Over-Spray from your Auto's and Boats

k9reno

Recognized Leader and K9 Guru
Lifetime Member
Premium Member
City
Punta Gorda
State
Florida
Dave,
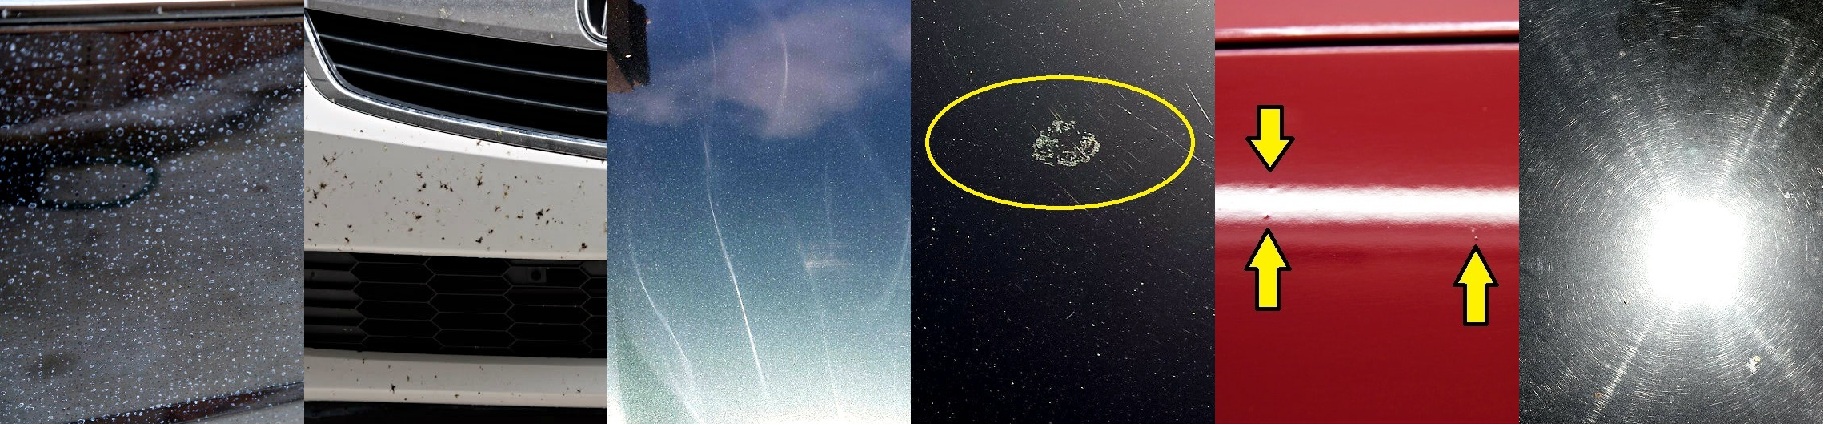
I have a question along these lines. I made a mistake a while back while spray painting some doors. The breeze made the location of my truck a few feet to close. Do you think the steps you outlined above would help get the white speckles off my clearcoat. If not I guess I will have a shinny black truck with white speckles. I have lived with it so far.... ;)

Thanks,
Dick
 
Good Afternoon Brother!
If the truck had any kind of paint coating and it was a water based paint, should not have much trouble getting it to come off ;) Here at the steps I would take...

  1. Wash the truck (in the shade) with a stripping level of soap, dawn might work well, but there are Detailer level soaps that are pretty strong that will strip off old wax, etc. which should help "start" the process of getting the paint loose / off like this one:
  2. Then using a Bug and Tar remover or (maybe a better choice) Carnauba cleaner wax and a microfiber cloth combo,
    WAC_201_16.png
    Gently rub that area in the direction of the air flow over the door and not in a circle if you can help it. My concern is that as the paint starts to come off, it could then mar the Clear Coat if not careful... So rub with a twisting / lifting motion, to help "lift" them off the Clear Coat and not push them into it...
  3. Then look it over again and see what is still on the paint? We have to take this on a process level of using the least abrasive product 1st, and go stronger as needed. If then clear of paint over-spray, then rewash to get all the bug and tar remover / wax off the paint. I would then use a IPA (see the second posting above on how to make some) wipe down on all the panels paint was on to make sure you get all traces of any stripping agents off the Clear Coat.
  4. I would then rewash again and use the Clay Bar system above, to pull out anything still in the paint (some would say even using Iron Free before such) to help make sure the Clear Coat is totally free of embedded contamination over the entire truck.
  5. Then either buff out what scratches you feel confident in working out (black paint always takes times to look good) and reseal the paint with Bead Maker and allow it to set up for a few hours for that "wet look we all love to have :cool:
Without seeing it, and how the progression of paint over-spray is being slowly removed naturally. Really hard to guide you though an entire paint decontamination process. I would also guard "against" using a RO Buffer and Wool Pad combo unless really needed? If so, then I would recommend using this as your compound of choice:
Do not though if at all possible, allow that stuff to really get baked into the Clear Coat by setting out in the Florida Sun. Could really make it a Royal Chore getting it not off, but OUT of the Clear Coat for sure... As such if you do not feel confident in tackling the process and I would figure at least one entire day to do all of these. Then I would send it to a local Detail Shop for a Exterior only paint Decontamination and sealant process before heading South. This shop looked able to tackle the job for a fair price in your area:


Might be the best money you ever spent making your Truck look as new as possible and giving it a good level of protection. You and I can always take it from that point, once you move and get settled in :)

Hope this helps?
Dave
 
Thanks I have been needing a project. I will document the process especially if it goes well. Your research skills are amazing.
Thanks again. We both will be down the first week of May. The house should probably be done by then. Take care.

Dick
 
Well I have been trying to depaint my truck. tired several different things but a spray detailer for lube and a synthetic clay bar and a lot of elbow grease seem to be making some progress. truck depaint job3.jpgtruck depaint job2.jpg
 
Getting there! But that appears (pending how long it took to get to that point in hours?) to be a slow way of doing it. What kind of paint was it, that made it onto the truck, and how long has it actually been there?

Once I know the paint type, then we might be able to go this route seen below, and speed up that process some ;)


I would also be tempted to hit it with a cleaner wax product on an application pad, followed up with microfiber cloth. Most cleaner wax types have some micro abrasives and wax oils, that should loosen up some of that paint.

Keep us posted!
 
Did a little searching Dick since I cannot see the panel in person, and maybe this video will help give you some options to try?


And really we need to start another seperate Thread on this subject (Paint over spray) so we can place all these steps and findings into it ;)
 
The paint that found its way onto my truck was an interior Latex gloss. After I found that the wind had changed and caused me a problem I figured that there was not anyway to really remove the paint from the truck. So as to how long its been on, its embarrassing, lets just say its well cured. :rolleyes:

I actually went to the Polish works place you searched up. The young guy there told me some things to try. He actually tried out a couple things to see what might be my best bet. He actually showed me the clay disk which actually showed some improvement in the condition. I was not able to locate a disk locally so I got a Griot's Synthetic Clay and went after it by hand. It made a very obvious difference but a lot of effort and some time. This has been the first day the crappy weather went away and I could actually put some time into it. The cold and rain is coming back tomorrow.

I hope I get more time to work on it this week, but we are pretty booked right now. Oh well, it's not like it needs to be rushed. Thanks for all the info. I will keep you all posted on the progress.
 
The weather got better this afternoon and I was able to put some more time in on the truck. Today I went at it again with the clay, but this time used a wax stripping car wash as the lube. It worked real well. The hood area hasn't looked this good in years.
20190423_173133.jpg
This was yesterday
truck depaint job.jpgtruck depaint job3.jpg
All the white specks in the paint now are chips in the paint Well it is a 16 year old truck
 
Does look better! And we can compound it out to level out even more in that Clear Coat and remove even more of those scratches you now see.

Now my thinking after that point, would consider either installing a thick colored PPF (Paint Protection Film) in black, to then cover that forward section of that hood to cover most of those present paint chips.

hood-strip1000x1000.png


And we might even be able to tackle it ourselves using a kit along these lines?

https://www.amazon.com/XPEL-Black-Universal-Guard-Protection/dp/B003EP52I8

This or have a local "vehicle wrap company" install a gloss or stain black wrap section on the leading edge of the hood to cover most of those chips.

Or... Just have the nose of that hood painted with a Black Line X Material to cover them, and pretty much put to rest, even having to deal with paint chips again! The picture below shows it on the entire truck, but I would just do the hood leading edge and on other areas (as needed) on the front ;)

mid_2013%20Chevy.jpg


Either option, should be less expensive than re-shooting that entire hood and other areas of the nose section of that truck with factory type of paint. And would last much longer! Much less expensive than a new truck for sure!

The rest of the paint though, we should be able to address and really make it POP again once you move, and we can work in her under our house in the shade ;)

How is that for some "out of the box" thinking? Oh, and it looks like we need to tackle those headlights on her and help bring them back some :)
 
Well I now have the front of the truck basically clear of the paint spots I think I may have caused a minor issue in the clear coat. I have noticed about half dozen spot where it looks like the clear coat is flaked open. Hopefully not a big issue.clear coat flake 2.jpgclear coat flake.jpg

Dave I hope this is the best thread for this post. I have not had the best placement lately :rolleyes:
 
Looks like, went past the Clear Coat all the way to the primer... Can you swing it by that same Detail Shop and have them take a quick measurement of the thickness of the paint in several locations? I am thinking it is time to just start making whatever body work needs attention like the doors, and just have her re-painted.

Along those same lines, could go with a repaint from one of the local shops in the original color (or color match it from one of the door jams for even better age blending) to help contain costs. Then we can really work on it after that re-paint set's up, and add the final compounding and blending and protection.

This or see the picture above, and have it covered in Line X and it will not be shiny again, but about as rugged as a chunk of old railroad iron :cool:
 
Well I an done with the truck until after the move. I got most all of the paint off the hood and fenders. I used the Butter Wet Wax after washing and today used the arma shield. If it was not for the chips and scratches that I dont have the knowledge or back ground to properly deal with the hood looks better that new. I used it on the windshield also and it is hard to tell there is actually glass there. Nice stuff.
 
Well I took pictures earlier, but all you could see were the sky and clouds. The sun is basically down now so I took some pics. Here you go Dave. Looks like a new truck, well cept for the scratches and chips :)
20190510_205108.jpg20190510_205135.jpg20190510_205150.jpg
The fenders and hood used to be covered with white paint spots. The white spots on the hood now are just chips in the paint. (16 yr old truck)
 
Simply Awesome!

Now we just need to hit her with the buffer and take out some of the scratches, and then some Bead Maker :D

Looks like a quick removal and clean up of the grill and then repaint it, would also add some more POP :cool:
 
Oh and in #11 above, those defects are called crow's feet and no amount of buffing will address such really. You might get them to fade out some, but they got to the primer coat. Here is a guide I found some time back on the various paint defects with some way to address them located here:


Hope this helps!
 
Back
Top