- State
- Rhode Island
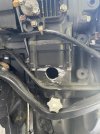
As most of you Suzuki enthusiasts know, and I’m finding out, a big issue with the outboard is the dreaded exhaust leak on the engine holder due to a steel cap threaded into a cast aluminum housing. I purchased the boat knowing full well this was an issue but I wasn’t too worried since if need be I could replace the entire housing on my own. That would be my end goal but I’m starting the season late so I wanted to try a quick and cheap solution until then. And much against what forums said (and Dave, sorry) I opted for the JB weld solution instead of the weld solution. Before I dive too deep into the work I just wanted to share a few thoughts to hopefully help someone else.
Welding aluminum isn’t an easy task, doing it right is even more difficult, getting it air tight in a tight space with important electrical components, gaskets and wires just inches away is almost impossible. The thought of potentially damaging these components to put on a better bandaid to the problem just didn’t sit right with me. So I opted taking a different route where my damage risk was almost 0.
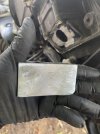
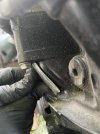
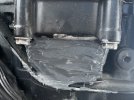
Going into the actual fix, the jb weld fix was already attempted on the motor and a brass plumbing cap was used to try to fill the hole. There was very little holding the cap on so taking it off was no issue. I cleaned up the surface with a 36 grit angle grinder and really roughened up the entire area I was going to apply jb weld to. I also cut out a piece of 1/8 in aluminum sheet (6061 tooling grade aluminum) to about 2.5” tall x 3.5” wide. I heated up the plate a bit and lined it up to the surface of the casting and hit it with a hammer to try to match the contour. I repeated this a few times to try to get it as close to the contour as I could. Not an exact match but it was close enough. I sanded both sides of my work piece with the 36 grit sand paper on all faces including around the perimeter. I then laid out the jb weld, I would ONLY use the 2 part individual sticks that are steel reinforced and have longer setting and curing times. These offer upwards of 5,000psi of tensile strength and can withstand exposure to temperatures of 600F. I was more concerned about temperature but I would be shocked if exhaust gases were that hot in the area. I applied enough jb weld to ensure that it would cover up the hole and squeeze around the perimeter of my work piece, this way I knew the coverage would surround the hole and ensure a air tight seal. Once the weld start dripping from the sides I flattened it back down and made sure there was no gap between the casting and my plate. I smoothed out all of the edges and added another layer of weld to the outside face of my work piece making sure to focus on the perimeter again. I’m going to let it sit for the full 24 hours before doing any kind of testing. After that I’ll start her up on the muffs with the cowling back on and see what happens. Will follow up with results.
Welding aluminum isn’t an easy task, doing it right is even more difficult, getting it air tight in a tight space with important electrical components, gaskets and wires just inches away is almost impossible. The thought of potentially damaging these components to put on a better bandaid to the problem just didn’t sit right with me. So I opted taking a different route where my damage risk was almost 0.
Going into the actual fix, the jb weld fix was already attempted on the motor and a brass plumbing cap was used to try to fill the hole. There was very little holding the cap on so taking it off was no issue. I cleaned up the surface with a 36 grit angle grinder and really roughened up the entire area I was going to apply jb weld to. I also cut out a piece of 1/8 in aluminum sheet (6061 tooling grade aluminum) to about 2.5” tall x 3.5” wide. I heated up the plate a bit and lined it up to the surface of the casting and hit it with a hammer to try to match the contour. I repeated this a few times to try to get it as close to the contour as I could. Not an exact match but it was close enough. I sanded both sides of my work piece with the 36 grit sand paper on all faces including around the perimeter. I then laid out the jb weld, I would ONLY use the 2 part individual sticks that are steel reinforced and have longer setting and curing times. These offer upwards of 5,000psi of tensile strength and can withstand exposure to temperatures of 600F. I was more concerned about temperature but I would be shocked if exhaust gases were that hot in the area. I applied enough jb weld to ensure that it would cover up the hole and squeeze around the perimeter of my work piece, this way I knew the coverage would surround the hole and ensure a air tight seal. Once the weld start dripping from the sides I flattened it back down and made sure there was no gap between the casting and my plate. I smoothed out all of the edges and added another layer of weld to the outside face of my work piece making sure to focus on the perimeter again. I’m going to let it sit for the full 24 hours before doing any kind of testing. After that I’ll start her up on the muffs with the cowling back on and see what happens. Will follow up with results.
 LOL
LOL")
")